How to Shoot Professional Product Photos for Your Ecommerce Store
If you’re growing an ecommerce business, you might feel you have a million things to do to be successful. People define success differently, but one straightforward measure of it is making more sales.
One thing that will help you increase your store’s sales is focusing on your product photos. In this guide, I’ll go in-depth into product photography: why it’s important, what you’ll need to begin, tips and tricks, and more. Let’s get started!
Why do professional product photos matter?
As I just mentioned, including professional product photos on your website will help you sell more.
First, keep in mind that customers online can’t touch products before they buy, so product photos are the next best thing. Put yourself in your customer’s shoes: You don’t want to spend your hard-earned money, wait days for your item to get to you, and then realize the product isn’t even close to what you wanted, right?
That said, customers are less likely to take the plunge and buy online if they aren’t sure what they’re getting. You’ll want to combat uncertainty by including lots of photos showing your products from different angles.
The quality of those photos matters, too: 75% of consumers say the quality of photos on an online retailer’s product page is “critical” or “very important” while deciding whether to buy. So, including not just product photos but professional-looking product photos is incredibly important for your website.
Using amazing photos also brings an impressive collection of benefits…
Great photos:
- Are eye-catching and get your customers to start browsing your online store.
- Show off what your store is about and let your customers grasp your “look” or “style.”
- Accentuate your product copy to create a powerful one-two selling punch.
- Get shared on social media and bring traffic to your store. (Did you know, for example, that 55% of people on Pinterest use the platform to find products to buy — and two-thirds of pins come from business’ websites?)
Now that we know why professional photos are important, let me show you how you can create them for some impressive results.
What you need to shoot professional-looking product photos
Many people hear “professional product photos” and get scared off. I’m here to tell you that the concept isn’t anywhere near as scary as it may seem!
The truth is, shooting your own product photos is actually very simple. You can get started quite easily, and you don’t need to pay a lot for photography equipment. As always, I generally recommend growing your business through your core strengths instead of trying to fix your weaknesses; however, if you are a creative type, you might enjoy shooting your own photos.
There are only four things you need to start shooting professional-looking product photos:
- A camera
- A tripod
- A white backdrop
- Lighting
Camera
Are you envisioning a fancy, expensive camera? Don’t worry, you don’t have to have one of those. The quality of smartphone cameras has improved tremendously over the years, and your smartphone should be just fine if you’re looking for a budget camera.
Two smartphones that are especially good for taking product photos are the Samsung Galaxy S7 and the Apple iPhone 6 Plus. The Galaxy S7 comes with a 12MP camera and a fast autofocus for decreased blur; the iPhone 6 Plus has an 8MP camera and an M8 co-processor (which means your phone will run smoothly while taking photos).
If you’re serious about product photography, buying a DSLR will be a great investment — you’ll see the difference in quality right away. Two DSLRs I highly recommend are the Canon Rebel T6s and the Nikon D810. Once you learn how to use your DSLR’s advanced functions, you’ll consistently shoot very pretty product photos.
Tripod
A tripod is a must to get steady shots of your products. If you’re shooting with your smartphone, try the Digiant 50-inch tripod. For a fantastic DSLR tripod, go with the ZoMei Z818.
White backdrop
A camera and a tripod are pretty self-explanatory, but how about a white backdrop?
Having a white backdrop is actually really helpful for product photography because it’ll make your images look much better. The reason is because it reflects white light onto your product, making your photo better lit.
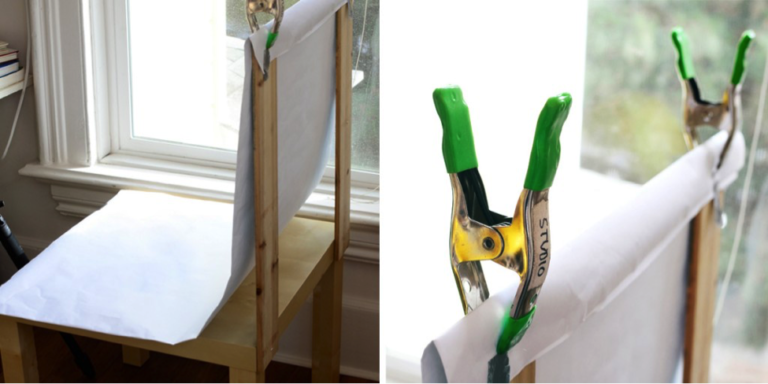
You’ll want to create a sweep, which is a backdrop that seamlessly transitions from a vertical to a horizontal surface. A sweep can be as simple as a large piece of paper clipped onto a table and scrap wood (see the image below). Or, if you want something professional you can use over and over again, you can simply purchase a sweep. Two great sweeps you can find are the Slow Dolphin Studio Backdrop and the LimoStudio Foldable Shooting Table.
Lighting
Last but not least, you’ll need some good lighting — an absolute must for great product photography.
Just like your backdrop, your lighting doesn’t have to be fancy. I always say natural light is some of the best lighting you can find; it’s inexpensive (you can’t beat free) and it brightens your products beautifully.
If you’d like, you can use artificial lighting so you can shoot at any time and control your light source. I recommend the Neewer 48 Macro LED Ring Flash and the LimoStudio Photography Lighting Kit.
Shooting your product photos
Now that you have everything you need, it’s time to start shooting.
First, set up your sweep. If you’re using natural light, set up your “mini photography studio” next to a window with the window to the left or right of where you plan to place your products. If you’re using a lighting kit, place a light on each side of the sweep as well as a light above and slightly behind where you’ll put your products.
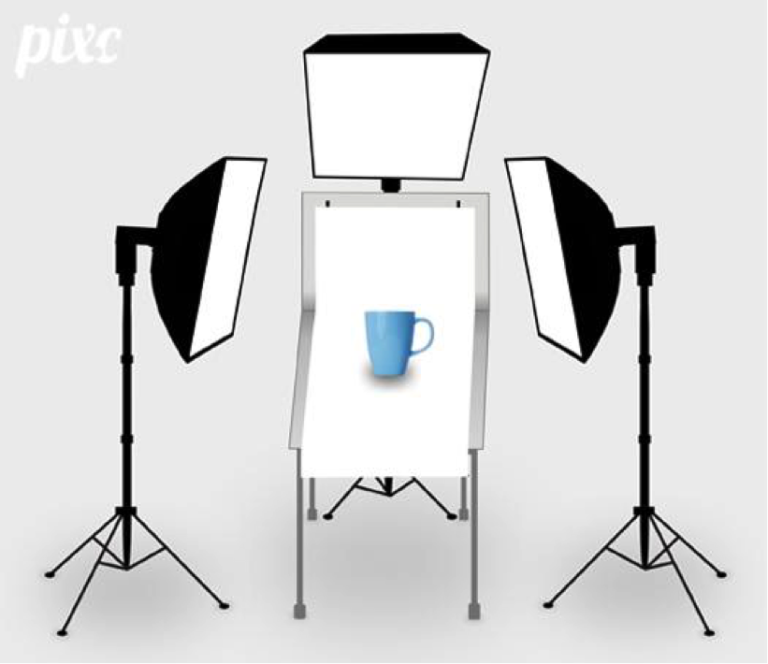
Now, mount your smartphone or DSLR onto your tripod and you’re ready to go! Here are a few tips to keep in mind while running your product photography shoot:
Take lots of photos
Unlike the old days where you had to worry about running out of film, in today’s digital age you can take tons of photos on high-memory devices. So, take lots of photos! It’s much easier to delete a photo you don’t like than it is to construct your entire photography setup again.
Shoot photos from different angles
Not only do you want to take a lot of photos, but you also want to shoot different sides of your products. Customers love getting 360-degree views of products — it helps them get a comprehensive idea of what they’re buying. Shoot enough photos so you’ll never lose a sale because someone is unsure what they’ll get. No customer ever complained about having too many product photos. In fact, the more product images you include on your listing, the more you’ll sell.
Don’t use the zoom function
Avoid using the zoom feature on both your smartphone and your DSLR. The zoom function does nothing more than crop your photo while you’re shooting, which will lower the quality of your images. Instead, do what professional photographers do and “zoom with your feet.”
Avoid harsh shadows
Regardless of what light source you use, you’ll want to watch out for harsh shadows around your product — those don’t look all that great. If you’re using natural light, keep in mind that your light might change due to the shifting sun. If you happen to have a fill light on you, you can use it to remove the shadows. Alternatively, you can use a reflector.
Consider taking in-context shots
You might want to try shooting in-context shots, which are photos that show your products in their ideal environments. For example, if you’re selling pillows then you can shoot them on a sofa that fits their visual style, or if you’re selling mason jars then you can shoot them as part of a kitchen lineup. In-context photos are fantastic because they help your customers see how your products might be used in everyday life.
Optimize your photos
So, your photo shoot went really well and you’ve taken a lot of great photos. Now it’s time to optimize your images in postproduction.
For photo editing, it’s tough to beat Adobe Photoshop. But if you’re looking for a free alternative, check out GIMP. There are a ton of effects you can create in both programs, but here are the main things you’ll want to focus on:
Remove the backgrounds of your photos
One last step that will make your photos look unbelievably professional is removing the backgrounds of your images. Removing backgrounds makes your product pages look extra sleek and helps keeps the focus on your products. Shooting on white is the industry standard and the technique is used by some of the biggest brands like Nordstrom, Target, and Kate Spade (see their product pages here, here, and here).
To remove backgrounds, use the pen tool in Photoshop to create paths. Of course, because the process can be tedious and time-consuming, there are editing services like Pixc that can do it for you.
Create an image template for your ecommerce store
You’ll want all of your images to look consistent on your website. To achieve that, you need to create an image template, which will ensure all of your photos are the same size and sit aligned when customers browse products on your site. Here’s a quick tutorial on how to create image templates in Photoshop. You can also create one in Canva.
Adjust the sizes of your product images
Your base images are the photos you upload to your site. Though your image templates will resize all of your photos consistently, the sizes of your base images matter in case you want to add a product zoom function to your website.
The ideal size for a base image is between 1,000 and 1,600 pixels on the longest side. This lets you walk a fine line between creating a satisfying zoom and not slowing down your website speed.
And there you have it
That’s all you need to know to start creating beautiful product photos! When you focus on improving your product photos, not only will your site look much more professional, but you’ll also start seeing an uptick in what really matters — your sales.
Author bio:
Holly is the founder of Pixc, an on demand image editing company. She has a passion for eCommerce and design. When she is not working, she loves travelling and drinking a good coffee.